Employees request expense reimbursement through Employee Access and the reimbursements will be deposited directly into each employee’s direct deposit bank account used in payroll.
Note: Each employee must submit his/her own expense reimbursement. An assistant cannot submit a reimbursement on behalf of another employee
Important: This process is for reimbursement from budget accounts. If a staff member needs reimbursement from an activity account, instead the activity sponsor must enter a check request to write a check for the employee needing reimbursement.
Checking Status of a Request
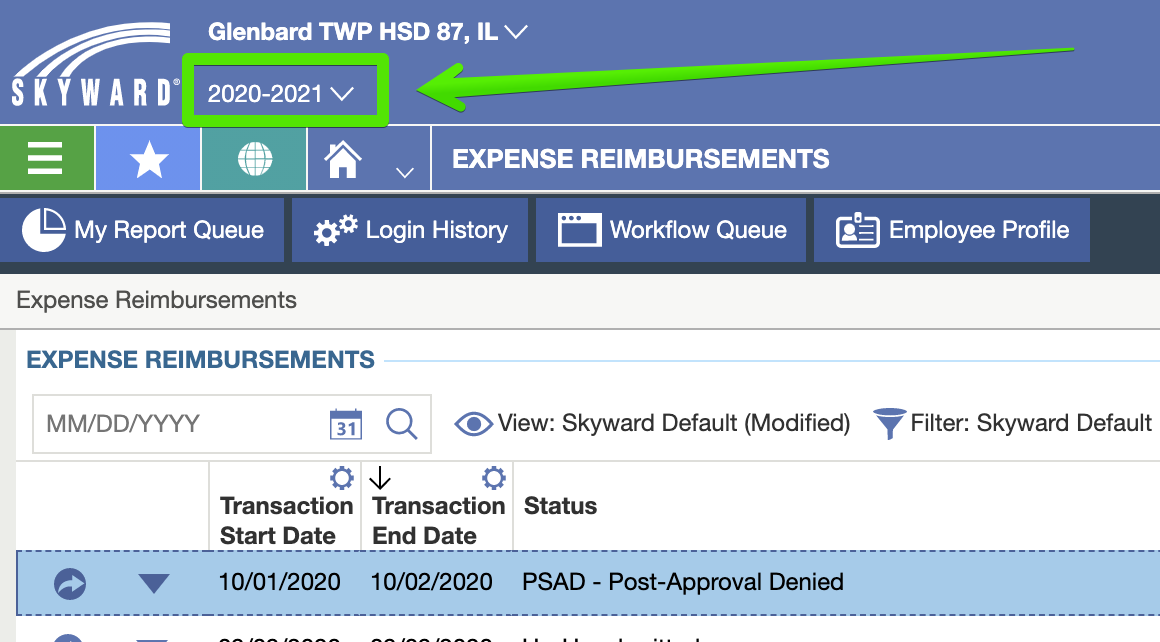
- From Employee Access, click the Expense Reimbursements tile.
- All pending and completed reimbursement requests will appear in a table on the next page.
- The Status column indicates the requests current status.
- Unsubmitted and Waiting for Expenditure need to be submitted by the employee.
- Waiting for Post-Approval is pending with a supervisor, Assistant Principal, or account owner.
- Post Approval Denied has been denied. Update the request and resubmit if appropriate.
- Waiting for Invoice. These requests have been approved. Accounts Payable will generate an invoice and pay the employee.
- History. Accounts Payable has processed the request.
- For pending approval requests, click the arrow (
 ) button on the left to view more detail.
 - Click on Post-Approvals on the left.
- In the table at the bottom, you will see who has already approved the request and which level of approval the request is currently pending at.
Submitting Expense Reimbursement Requests
- From Employee Access, click the Expense Reimbursements tile.
- Important. Before proceeding, check the fiscal year in the upper-left and make sure it reflects the current year.
- Click the Add Expense Reimbursement button near the upper-right.
- Click the Add Attachments button.
- Click Select files and browse to the receipt file on your computer.
- You can repeat these last two steps as many times as needed.
- If you have multiple Assignments, choose your primary assignment.
- Choose the Start and End dates when the expenses were incurred.
- Type a Description of the overall reimbursement request.
- Click the Save & Add Detail button.
- You are now on a detail line. You will be able to add multiple detail lines for a single reimbursement request. i.e. You might open one request for a 3 day professional development conference, and add 4 detail lines: 1 for your mileage and 3 for each days meals.
- On the detail line, select a Date for that detail.
- Select an Expense Reimbursement Type.
- Type a Description.
- Type a Quantity if it is not automatically set by the Reimbursement Type.
- Type an Amount if it is not automatically set by the Reimbursement Type.
- Begin typing an account number in the Account field and select the account when it appears in the drop-down list.
- To add more detail lines, click Save & Add Another.
- To add items to the request click either the Add or Mass Add Detail button. Add allows one item to be added at a time. Mass Add Detail allows for up to 4 items to be added at a time.
- For each line item do the following:
- Choose a Date of the expense.
- Select a Reimbursement Type from the drop-down menu.
- Enter a Quantity and/or Amount depending on the type of reimbursement. i.e. For mileage, you can enter quanity of miles but not the amount per mile to be reimbursed versus lodging where you enter the final bill as the amount.
- Type in a Description of the line item.
- Choose an Account for the charge.