
Glenbard uses the Processing section for loading students to the master schedule.The Processing section of PowerScheduler is used to automate parts of the scheduling process, perform quality assurance of the master schedule, and commit the master schedule. This is only handled by each building’s Data Specialist and by the District Office. Glenbard does not currently use the automatic master schedule creation or the build. Glenbard manually builds the master schedule and then uses the load process.
Each building’s Data Specialist is responsible for the Load.
There are two links on this one line: Load which is used to define and trigger the load reports and (Q) which displays the reports.
- Install PowerScheduler Engine
- Data Specialists validate the load and correct errors.
- When all errors have been resolved, Data Specialists run the load.
- District office will import the results.
- When the schedule meets the needs to the building, it should be left alone.
- The commit will take place as a part of the roll-over process.
Installing the PowerScheduler
- Log into PowerSchool
- Click on PowerScheduler
- Click on Engine Download
- Click the appropriate download
- Install the engine.
- You may need to have a technican install the engine if the computer is frozen
- If the computer is frozen, you can install the engine, but it will have to be reinstall after each time the computer reboots
Validating the load
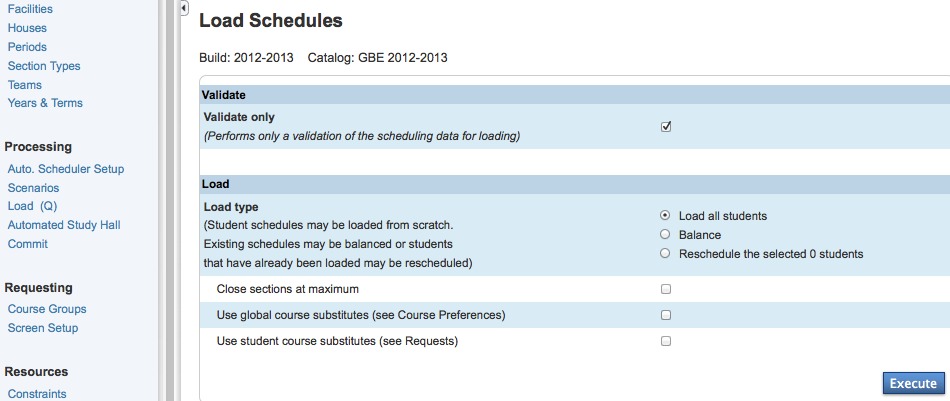
- Click Load under Processing from the navigation menu
- When validating the load, always click the checkbox marked Validate Only
- Setup the load options:
- Load Type- Determines which students should be rescheduled
- Load all students
- Balance – The system adjusts student schedules to help improve the balance of students among sections. There is no guarantee that students’ schedules will not change.
- Reschedule the select [x] students – The system reschedules only students whose schedules have not been locked. You can select this option multiple times.
- Close sections at maximum – Do not select the checkbox the first time you do a load. The build itself runs without considering section maximums, so this will let you determine if you can get better load percentage. Also, not closing sections at their maximums will help you focus on students with conflicts.
- Use global course substitutes
- Use student course substitutes
- Load Type- Determines which students should be rescheduled
- Click Execute
- Download the file to the Desktop
- Open the file in a text editor
- Change all of the http to https
- Save the file
- Right click on the file
- Choose open with
- Choose PowerScheduler engine
https://youtu.be/eji8FLyUGo4
Review the results and correcting the errors
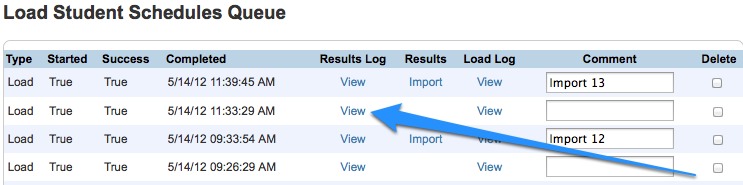
- To retrieve the results click (Q) under Processing from the navigation menu
- The next screen lists out all of the attempts to validate/run the load in table format.
- A particular validation attempt can be located by reviewing the time in the Completed column
- If the Started and Success columns are not True, then the validation/run did not execute appropriately.
- The results can be found in the link in the Results Log column
- The Results, Load Log, and Delete columns are only used by the District Office
- Click on the View link in the Results Log column
- The top section of the results log lists details about the validation/load. The important details are:
- Students fully satisfied
- Total students to load
- The section part of the results is a list of all the information, warnings, and errors. These errors must be researched and corrected. The warnings should be corrected if possible. Refer to the Load Errors and Warnings article for more details.
- Continue to validate the load and address errors until there are no more errors.
Run the load
- Click Load under Processing from the navigation menu
- Uncheck the checkbox marked Validate Only
- Setup the load options:
- Load Type – Choose Load all students
- Close sections at maximum – Check this box when running the load.
- Use global course substitutes
- Use student course substitutes
- Click Execute (video)
- Download the file to the Desktop
- Open the file in a text editor
- Change all of the http to https
- Save the file
- Right click on the file
- Choose open with
- Choose PowerScheduler engine
https://youtu.be/eji8FLyUGo4
Importing the load
- When the load has been run, a Web Help Desk ticket must be sent to district to import the results.
- District office will click to Import the link to execute the import (creation of student schedules in PowerScheduler). Only District has access to execute this function.
- It is possible to have section bitmaps and class counts not display properly
- If the class counts are incorrect, the function Class Counts (PowerScheduler>Function>Class Counts) can be run.
- If the section bitmaps (ie matrix views) are incorrect, the function Regenerate Bitmaps (PowerScheduler>Function>Regenerate Bitmaps) can be run.
- If in the case neither of the above functions work, please run Reset Section Meetings (PowerScheduler>Function>Reset Section Meetings)
Unused Sections of Processing
Glenbard does not use the following features in the Processing section which are part of the build process:
- Auto Scheduling Setup-Defines the terms, days, and periods that PowerScheduler uses when building the master schedule.
- Scenarios-Also known as Build Scenarios, the Scenarios section of PowerScheduler allows users to dictate rules that PowerScheduler uses when building the master schedule instead of the end users performing the leg work in constructing the year’s schedule.
- Automated Study Hall-If PowerScheduler builds the master schedule, the settings on Automated Study Hall can be used to allow PowerScheduler automatically assign study hall sections.