-
-
- Start with your department chair or PLC leader who has received more training.
- Call or email Anita Ball (anita_ball@glenbard.org) x5127 @ District Office.
- Talk to your API and/or get an appointment with our consultant Steve Biddinger.
-
-
- General Assessment Reports are basic reports that do not rely on the questions being aligned to standards.
- Learning Objective Reports – use the learning standards
- Grades are not automatically put into PowerSchool. Grades can be exported into PowerSchool, but please make sure your list matches the PowerSchool roster. There must be blanks inserted for students who were absent.
-
-
- Put sheets Head In & Face Down, and then click the scan button.
- Do not stop scanning or close the window until all forms are showing in the sent box (lower box).
- Scanners will not leave any marks or scores on the answer sheet.
- To give students their scores, you will generate a report.
-
-
- For Mac Users
- Use plain paper
- Set page scaling to NONE or 100%
- Uncheck options to AUTOROTATE & CENTER
- Never copy answer sheets. All answers sheets are unique to each student, so they must always be printed or reprinted.
- When possible, send answer sheets to Xerox copiers for printing.
- Always print using the two-sided option to save on toner and ink.
- Never staple answer sheets
- Create 3 extra blanks answer sheets.
-
-
To successfully setup Answer Sheets, please follow the guidelines below:
- All answer sheets must have a unique name across the district. Please use the following naming convention to help simplify the process and create unique names. Any assessment not using the naming convention below will be deleted.
- For Individual sections assessments:
Course.Teacher Last Name.Assessment.School Year
- Example:
Algebra.Donohue.Ch7Quiz.2011-12
- For District Wide assessments:
District.Teacher Last Name.Assessment.School Year
- Example:
District.Algebra.Donohue.Semester1Final.2011-12
- Questions should be aligned to standards whenever possible (new standards can be added as necessary).
- Mastery Manager allows teachers to create an answer sheet to go with their existing tests and then receive reports from that data. Scanning is done on plain white paper.
-
-
- Go to MasteryManager.com
- Click on Login in the top right
- Type in your login information
- The User Name is your Glenbard email
- If the password is unknown use the Forgot Password? Option at the bottom
- Click Log in
It is vital after the first login to immediately change the password. Once logged in, click setup to change the password.
-
-
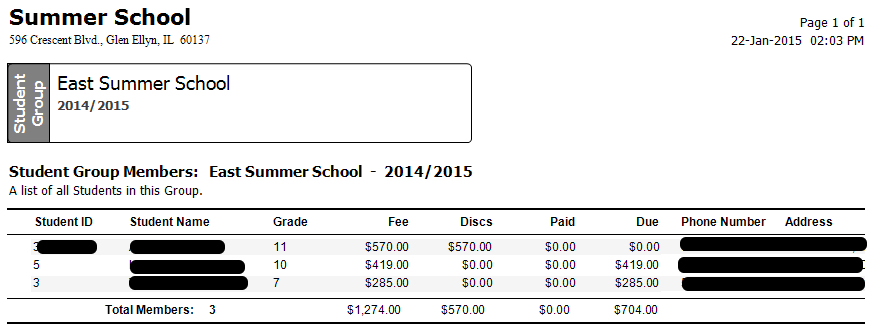
- Click on Student Reports.
- Click on Student Group Members.
- In the 2nd drop-down under Student Group, click Homeroom
- Then click on the school.
- To only print students with balances owed, change the Due filter to > 0.
- Click the Preview button to get a PDF or the Print button to print immediately.
-
-
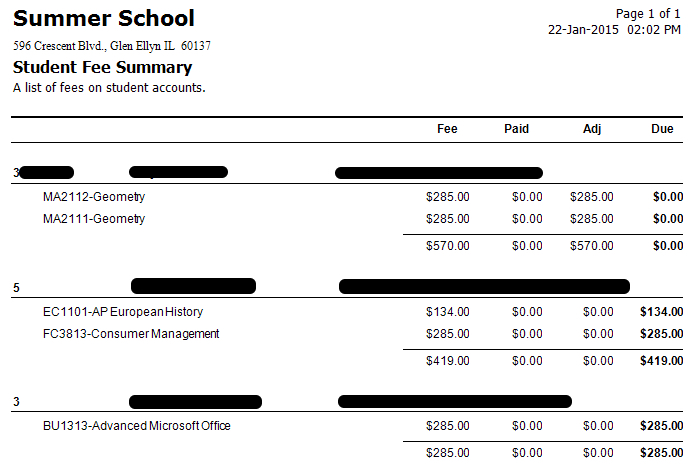
- Click on Student Reports.
- Click on Student Fee Assessments.
- In the 2nd drop-down under Student Group, click Homeroom
- Then click on the school.
- To only print students with balances owed, change the Due filter to > 0.
- Change the Fee Years drop-down to the current year to exclude students that still owe from prior years.
- To only see one fee, choose One Fee from the Fees to Include drop-down. Then select a Fee.
- Click the Preview button to get a PDF or the Print button to print immediately.
-
-
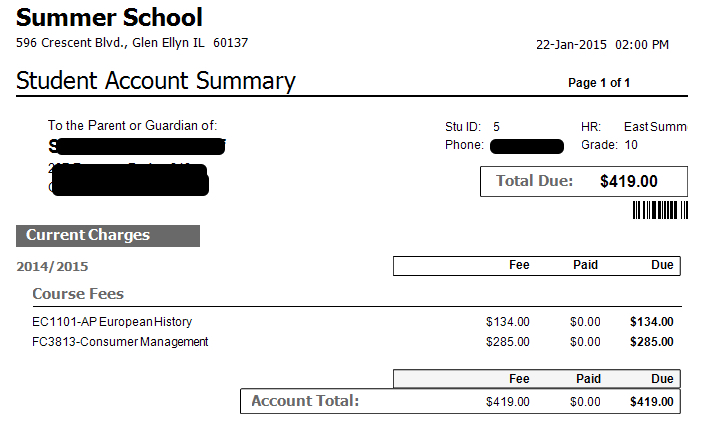
- Click on Student Reports.
- Click on Student Account Statement.
- In the 2nd drop-down under Student Group, click Homeroom
- Then click on the school.
- To only print statements for outstanding students, change the Due filter to > 0.
- In the Fee Years drop-down, choose the current year in order to exclude students who still owe from prior years.
- Click the Preview button to get a PDF or the Print button to print immediately.
-
-
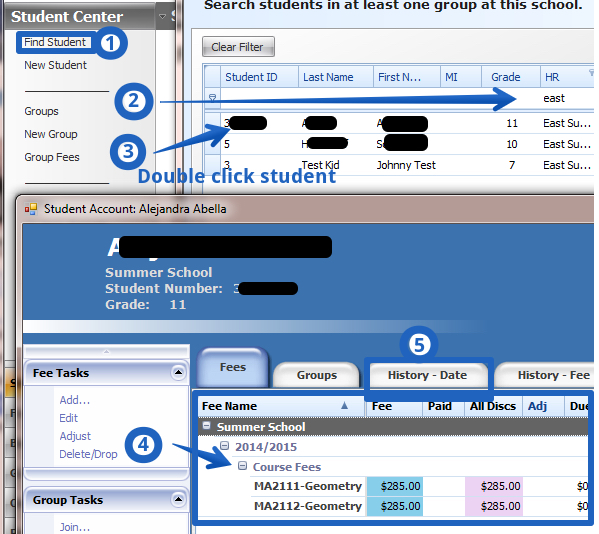
- Click on Find Student in the upper-left to pull up a list of students.
- Type an ID or name in the blank row, under the headings, to filter the list of students. (The HR column is school building.)
- Double-click on a student to pull up his/her records.
- The student’s Fees are list in the middle of the page with Paid in green,Waived in pink, and at the right amounts still Due.
- Click the History – Date tab to view a history of the account or click Account Statement to print a statement.
-
-
Objective: If a student is returning a book for a paid fine and has less expensive fines, the return should be applied to pay off the remaining fines, and the student may receive a refund if the student does not have other outstanding fees in Acorn.
- Check in the textbook that has been returned.
- When the textbook is checked-in, that books fine will zero out and the paid amount will reassess and completely pay off the students fines. There will also be an amount left over as a credit.
- Click the “Edit Fines” button from the student’s page.
- The amount of the available refund will appear in Follett. Write this amount down to request a refund from the Bookkeeper. This is the maximum refund that the Bookkeeper may issue.
- Click the “Update” button to record in Follett that the refund has been issued.

- Ask the bookkeeper to adjust the student’s Acorn account accordingly and issue a refund check if possible:
- To zero out the old fine.
- To reassess the dollars collected on the old fine to the remaining textbook fines.
- To issue a refund check for XX.XX dollars, from step 5, if the student has no other dollars due in Acorn. Note: If the student has other fees due in Acorn, the refund will be used against the remaining fees in Acorn instead of sending a refund check.
-
-
Objective: If a student is returning a book for a paid fine and has more expensive fines, the entire return should be applied to the remaining fines.
- Check in the textbook that has been returned.
- When the textbook is checked-in, that books fine will zero out and the paid amount will reassess to other textbook fines.
- Ask the bookkeeper to adjust the student’s Acorn account accordingly:
- To zero out the old fine.
- To reassess the dollars collected on the old fine to the remaining textbook fines.
-
-
Objective: If a student is returning a book for a paid fine and does not have other fines, the entire return will either be refunded to the student or applied to other outstanding fees in Acorn if they exist.
- Check in the textbook that has been returned.
- When the textbook is checked-in, that books fine will zero out and the paid amount appear as a left over credit.
- Click the “Edit Fines” button from the student’s page.
- The amount of the available refund will appear in Follett. Write this amount down to request a refund from the Bookkeeper. This is the maximum refund that the Bookkeeper may issue.
- Click the “Update” button to record in Follett that the refund has been issued.
- Ask the bookkeeper to adjust the student’s Acorn account accordingly and issue a refund check if possible:
- To zero out the old fine.
- To issue a refund check for XX.XX dollars, from step 5, if the student has no other dollars due in Acorn. Note: If the student has other fees due in Acorn, the refund will be used against the remaining fees in Acorn instead of sending a refund check.
-
-
The entire student body is imported to the central office server from PowerSchool each Friday. New students will be added to each building’s records overnight, so the bookstore managers will see new students each Monday. In the mean time, add a new customer record and set the “Last Name” to be equal to the student’s ID. Any sales under this record will be merged into the students actual record after import. If the student has been enrolled in PowerSchool for over a week and is still not in the POS system, submit a Web Help Ticket with the student’s ID.
-
-
Each school is licensed to run a main POS station and two spares.
-
-
- Verify that the buildings main unit and spare units are all on the same subnet.
- On the main unit, click File
- Verify that the third option in the File menu says “Switch Company File to Single Mode“. If it says “Switch Company File to Multi User Mode“, then click that option.
- If the above two options have been done then…
- Switch the main unit to Single Mode
- Then switch the main unit back to Multi User Mode
- If #4 didn’t work, try shutting down the spares, then performing #4, then during the spares back on.
-
-
The $85 Digital Curriculum Fee still applies for students who bring their own devices. The $189 iPad Rental Fee can be removed. Pay the total amount due less $189 dollars. Initially, $189 will allocate to the iPad rental. During back-to-school the student will fill out a form declaring he/she will bring his/her own device. Once the form is on file, the student’s account will be updated to reflect a BYO status. The iPad fee will be removed from your account and the $189 will be reallocated to appropriate fees.
-
-
Parents can pay online, by credit card, or electronic check. Parents must be logged into PowerSchool and click the “Student Fees” link.
- Parents can pay in full before the due date.
- Parents can pay partial amounts multiple times as long as they pay in full by the due date.
- Parents can sign up for a 4-installment payment plan online.
- Parents can apply for a waiver of fees with the APSS.
If the parent states that he/she can only pay in cash, the bookstore manager can take the payment and provide a receipt.
-
-
Pay the total amount due less $350. Initially $350 will be allocated to the Driver’s Ed fee. When school starts, the student may have his/her schedule adjusted by a counselor. The Driver’s Ed fee will be removed from the student’s account at that time and the $350 reallocated to appropriate fees.
-
-
Textbook fines and library fines are on student statements but they are assessed by the bookstore managers and library staff. Bookkeepers can tell if a fine was paid, but they cannot help answer questions about why a fine was assessed. Bookstore managers can lookup the detail on why a textbook fine was assessed. Librarians can look up the detail on why library fines were assessed.
-
-
This will the amount of funds available to your Purchase Order security group (i.e. East Science or District Curriculum).
If you have access to multiple Purcase Order groups, you can select which one will display in this widget:
- Move your cursor over the arrow that looks like a circle

- More buttons will display to the left of the circle.
- Click the down arrow button.
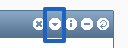
- Select a group from the Account Group drop-down.
- Click the Save button.
-
-
This will display your available time off hours and also provides a link for requesting time off.
-
-
RSS Feeds allows for news feeds to display on your Skyward homepage. To set which feeds display follow these steps:
- Add the RSS Feeds widget to your homepage.
- Move your cursor over the arrow that looks like a circle.
- More buttons will appear.
- Click on the down arrow button.
- Place check marks next to the newsfeeds that you want for your homepage.
- Click the Save button.
Note: The “Other” option will allow users to setup any RSS feed they wish; however, this feature is NOT supported by Glenbard Technology.
-
-
Recent Programs is a listing of recent pages in Skyward that you have visited. Click the blue page titles to jump right back to those pages.
-
-
My Print Queue provides quick access to the reports that you have recently printed.
- Your last five printed reports display on the Widget.
- Click the My Print Queue heading to see all of your recent reports.
- Reports may be deleted from the print queue storage after 2 days.
-
-
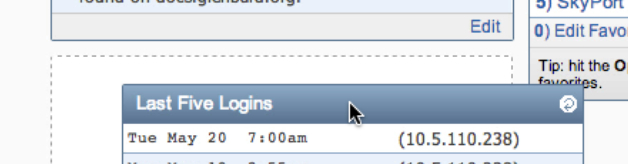
Last Five Logins provides the time, date, and IP address from the last five times someone has logged into Skyward using your account. This is helpful for monitoring the security of your account. Be mindful, that if you log into Skyward at work, from home, on a tablet, and phone you may have four or more different IP addresses accessing your account.
-
-
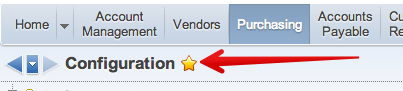
Favorites is a listing of Skyward pages that you have marked as a favorite. Click the page name in the widget to jump directly to that page.
Any page with a grey star to the right of the title can be favorited. Click the grey star to turn it yellow. Once yellow it is a favorite and will appear in the Favorites widget on your homepage.
-
-
District News provides information and helpful links. These may be links to Skyward guides or may be helpful notices from Human Resources.
-
-
- Find the Jump to Other Dashboards widget in the upper-left corner of your Skyward homepage.
- Click Select Widgets in the bottom-right corner of this widget.
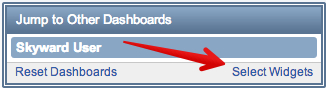
- Check the box to the left of any widget name that you want to add.
- Click the Save button.
-
-
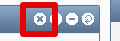
- Move your cursor over the symbol of an arrow in a circular shape.
- More buttons will appear to the left of the arrow.
- Click the “X” button and the widget will be removed from your homepage.
-
-
- Move your cursor over the heading of a widget. Your cursor will change into a four direction arrow.

- Left click and hold down the left mouse button.
- Move your cursor around the screen. The widget will follow your cursor.
- As you drag it to different spots on the homepage, a dotted line with highlight where the widget’s new location will be based on where your cursor is at the moment.
- When you find a good spot, let go of the mouse button and the widget will move into the dotted rectangle.
-
-
An upgrade to Skyward software added a new optional widget that users can add to their Skyward homepages. The message is the system attempting to notify you of the new widget and find out if you want it on your homepage.
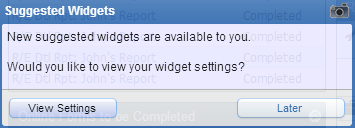 To stop the message from appearing, click View Settings. You can take further action, but once you click View Settings you will not see the message again unless a future upgrade provides new widgets. To exit the settings screen, click the Backbutton.
The new widget that you could add to your account has an orange arrow that says “New”.
To stop the message from appearing, click View Settings. You can take further action, but once you click View Settings you will not see the message again unless a future upgrade provides new widgets. To exit the settings screen, click the Backbutton.
The new widget that you could add to your account has an orange arrow that says “New”. To add the new widget to your Skyward homepage, check the box to the left of the title of the widget. Then click the Save button. You can always remove the widget at a later date.
-
-
In Skyward, widgets are small tools that can be added to your Skyward homepage. They can be moved around your homepage and arranged in an order that is most helpful to you. Except for two, all the widgets are optional. You can remove all widgets from Skyward homepage other than “Jump to Other Dashboards” and “Jump to Other Systems”.
-
-
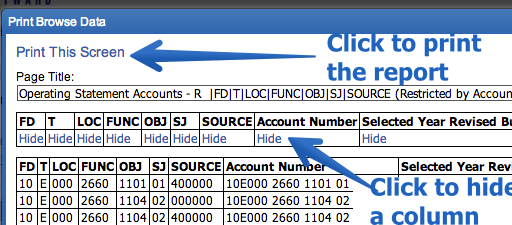
To print all of this information look for the wording View Printable Details after you expand. This will open another window that gives you an option to Print this Page in the upper left corner. You may X out in the right blue area. This is the only window you should X out on the right — always use the Back or Exit option.
To save off a list of all of your accounts and balances click on the Excel icon to export your accounts to Excel. 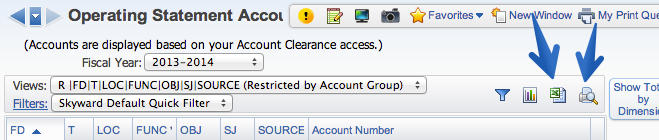
Or click on the printer icon to generate a PDF. Once you click on the printer icon a second window will appear. Along the top is a list of the columns included and the word Hide under each column. Click Hide to hide a column when the PDF generates. Once the report looks OK, click Print This Screen.
-
-
To view all information that has been inputted on your account go to Account Management and then go to Operating Statement of Accounts.
Click the arrow link in front of the account number.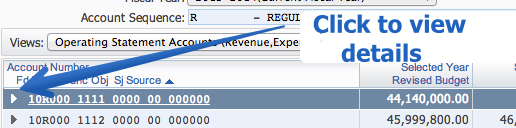
Expand All will show you the following information:
- Monthly Account Activity – A full year of activity is displayed. If a month is shown in blue ink versus black you can click on it to view check activity. Now click on the arrow by the posting date and you will get a line-by-line list of vendor names, invoices, dollar amounts, and check numbers that were run with that batch.
- Detail Account Activity provides a high-level summary of activity that has hit the account.
- Account Encumbrance Activity provides details on claims on funds that are designated to be paid via a PO but have not yet been invoiced and paid.
- Purchase Orders Using This Account lists all purchase orders generated. (Note the first 3 digits of a PO let you know what group or dept. entered it. Each area has been assigned a number – for example: East Science Dept. 119.)
- Accounts Payable Invoices Using This Account only shows that an invoice has been received at district.
- Credit Card Transactions Using this Account is not presently used by Glenbard. Pcard transactions can be found under Detail Account Activity.
- Account Budget Activity lists the budget
- Account Description shows name, fund as either educational/O&M/Trans., type as either revenue or expense, location or school/district, function or department, object of account such as supplies for example, subject or sub-object category, and source of funding such as Grant, Title 1
- Account Information notes if account is active or inactive.
-
-
- Click on Account Management
- Click on Account Profile
- Select and change the account number at the top as needed.
- Click on the headings on the left side to view different details about the account.
-
-
The Sources setting controls type of information included. This can only be used in Detail reports; not Summary reports.
- The first thing on the Sources tab is a table with different sources of financial activity such as Accounts Payble, Accounts Receivable, Payroll, etc. Check the box on the left of each source to include batch level numbers for the source on your report.
- Check the box on the right of each source to include that soure in the detail.
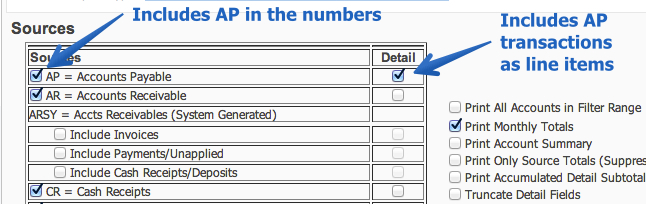
- Check the box for Print All Accounts in Filter Range to see all accounts. Otherwise, only accounts with activity during the specified range will print on the report.
- A Detail report can be run across multiple months. Check the box for Print Monthly Totals, for monthly totals to print for each account.
- The Print Account Summary box may be checked to include the following details after each account.
- Budget
- Amount Spent
- Amount Left
- Percent Left
- Amount Encumbered
- Amount Left Unencumbered
- Check Print Only Source Totals to suppress all the detail lines on the report.
- The Print Accumulated Detail Subtotals prints subtotals at each Break specificied on the Breaks tab.
- Check one of the boxes under Purchase Order Parameters in order to print open Purchase Orders details on the report.
- The Include Budget Requisitions option can be ignored for Glenbard.
Examples:  print monthly totals.pdf
-
-
- Set fields on the report.
- Click the Select Fields button to add fields to the report.
- Check the boxes next to the fields to appear on the report.
- Click the Save button.
- Once fields have be set, the appearance of those fields can be adjusted.
- Highlight fields in order to adjust the appearance of that field.
- Click the Up or Down buttons to change the order of the highlighted field. The top to bottom order of the fields on this page will be the left to right order seen on the reports.
- Each field has two lines of headings. Type any changes to Heading 1 andHeading 2 in order to change a fields heading.
- The Length option can truncate fields length. This should only be used on text fields. Truncating numbers will cause “?????” to appear instead of an actual number.
- Account number elements have a Display option as well which determines if the actual account number will display or a description of the account number.
- Numbers have additional options as well. The Format field on this page will give a preview of how a number will display based on your choices.
- The Sign option determines how negative amounts will be displayed.
- Click the left or right arrows next to the Year option to change the fiscal year.
- Keep the Edited option checked in order for commas to be used in the number format.
- Check the box next to Whole Number in order to round to a whole number.
-
-
- On the Account Ranges field set the subset of fields that you wish to see on the report. If you wish to see all your accounts, skip to Step 12. Note: No matter what you specify in the ranges, you can not receive information on accounts if you do not have access to those accounts.
- Use the checkboxes to choose whether to see Expenses, Revenues, and both.
- In the Dimension area specify a Low and High value to create ranges. Any accounts within that range will appear on the report.
- Example 1: To only see function 2660, set the Low FUNCTION value to 2660 and the High FUNCTION value to 2660.

- Example 2: To only see state & federal grants on the report, set the Low SRCE-FUNDS value to 300000 and the High SRCE-FUNDS value to 400000.

- To exclude certain funds within your specified ranges, use the Exclude Filters for Operating Statement Accts area.
- For this example, will we say that we want functions 1111, 1112, 1114, & 1116 to display on the report but not 1113 or 1115.
- We would have set the FUNCTION Low value to 1111 and High value to 1116.
- In the Exclude Filters for Operating Statement Accts area click the Addbutton.
- From the Range Field drop-down sleect EXPENSE FUNCTION
- Set the Low and High values to 1113.
- Click the More button.
- Set the new Low and High values to 1115.
- Click the Save button

- This would result in showing all functions between 1111 and 1116 excluding 1113 and 1115.
-
-
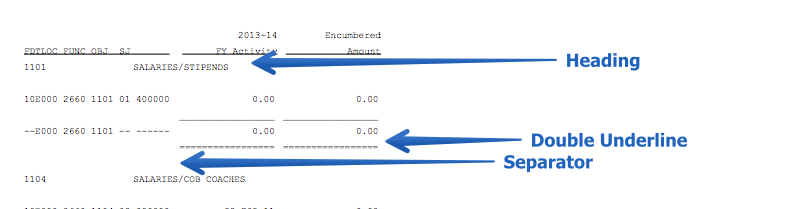
Breaks allow the report to create subtotals and or if Print Detail is set to No, the Breaks also allow the report to only consolidate subtotals for a group of accounts.
- To set a break, check one of the check boxes on the Breaks page. When setting a break, check the box in the last digit of the element to subtotal; not the digit following. For example: For subtotals on Location, check the 3rd box in the LOC grouping; not the 1st box in the FUNC group.
- For each Break, there are additional settings that can be configured:
- The Break drop-down, sets whether there is a Single space, Doublespace, or Page break when a break is met on the report.
- Setting Heading to Yes will cause print the text definition of the element where the break occurs. For example, if Heading is set to yes on a break in the Fund, then your report may list out headings like “Educational Fund” or “Transportation”.
- Setting Separator to Yes will place a blank line between a grouping of accounts and that groupings subtotal.
- The Double Underline puts a double underline under each column of dollars.
 Example: spacing of breaks.pdf
-
-
- Type any Notes in the first box. This is an area for reminders that indicate the use of the report.
- If Conslidate Funds is set to Yes then the sorting of the accounts will ignore the Fund. Example: 10E001 2660 00 and 20E001 2660 00 are not sequentially next to each other, however if Consolidate Funds is set ot Yes, then they will appear near each other since the sorting of accounts will begin at Location instead of Fund.
- Budget Balance – Typically users will use All Accounts.
- Under Budget Only or Over Budget Only – Unexpended Balance will return matching accounts ignoring encumbrances.
- Under Budget Only or Over Budget Only – Unencumbered Balance will return matching accounts encorporating both expendatures and encumbrances.
- Print Detail works with the Breaks tab to the accounts that display.
- By selecting Yes, every account in the range will display.
- By select No, the report will only show subtotals based on the breaks that have been setup. For example, a user could roll up each Fund and Location.
- Print Totals prints a grand total at the very end of the report.
- Supress Zero Amounts leaves a blank space in place of any field that would be $0.00.
- Account exclusions allow for additional account exclusions. Check the box and then select from the drop-down menu.
- If checked Addt’l printing prompt for current user will force the user to select an account range before printing.
- Click the Save and Add Breaks button.
Examples: consolidated funds.pdf, print detail.pdf, suppress zeros amounts.pdf, account exclusions.pdf
-
-
Important: Once the Report Type is set for a report it can never be changed. If you need to change the report type, you will need to start over with a new report.
- Click the Add button
- Type a Report Name. This is what will appear when selecting a report in Data Mining.
- Type a Report Title. This will appear on the printed report.
- Select a Report Type. This encompasses both the type of funds and the level of detail to included on the report.
- Fund Type:
- Revenue/Expense – This will be the most commonly used selection outside of the business office.
- Balance Sheet – This will include assests, liability, and equity.
- Combined B/S and O/S – This will include all fund types.
- Summary versus Detail:
- Summary – Summary reports only run by month. To view only rolled up totals, use Summary. Choosing Summary will mean that the Sources page is unavailable for use in the report.
- Detail – To view transaction level activity on a report, use Detail. Detail reports also run based on a date range set by the user instead of a specific month.
- Click the Save and Add Parameters button to save the report information and set Parameters.
An example of Summary a report and a Detail report which have the same fields selected:
summary vs detail.pdf
-
-
For shipping, add a detail line item with a description of “Shipping” and enter the shipping cost in the “Amount”.
-
-
A PO number is assigned once it is submitted for approval. Until the requisition has been approved and printed it can still be edited. From the “My Requisitions” menu highlight the appropriate requisition and click the “Edit” button to make changes.
To ensure that a requisition remains unprinted for the longest time, enter your requisition at the start of the day. The business office typically approves and prints purchase orders at the end of the day, so if you enter a requisition at 8:00am that will likely give you 7 hours to receive an updated price and be able to update the amount on your requisition.
Once a requisition has been approved and printed, it cannot be updated; however, accounts payable will pay the vendor based on the invoiced amount and not the dollars listed on the purchase order.
-
-
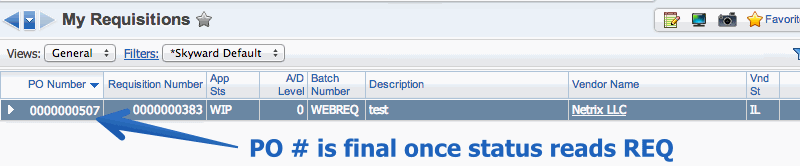
A usable PO number will not be generated until the requisition has been submitted for approval.
The PO number can be found once the requisition is submitted for approval, however remember that your requisition could be denied. The approval status (App Sts) of a requisition submitted for approval is “REQ”.
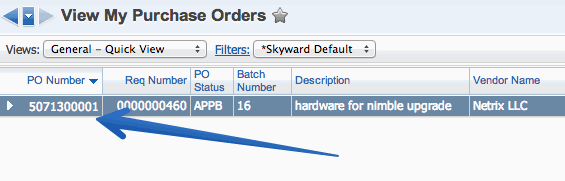
 Once your requisitions is approved, it will appear under the View My Purchase Orders menu where you can also find the PO #.
-
-
Skyward does not have a built in discount function. To record a discount on a requisition do one of the following:
- For discounts on individual line items, calculate the new amount after discount, and type the discounted rate in the Amount field on the line item detail.
- For discounts on the whole requisition, calculate the total discount, add a line item with a description of “Discount” and enter the amount as a negative.
-
-
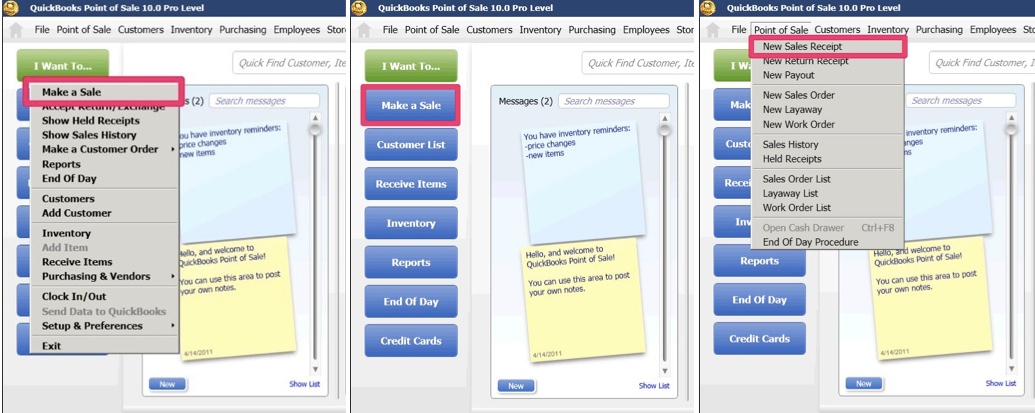
- There are different ways to start a new sale; each method will take you to the same exact place. The three ways to initiate a new sale are:
- I Want To… > Make a Sale
- Home Screen > Make a Sale
- Point of Sale > New Sales Receipt
-
-
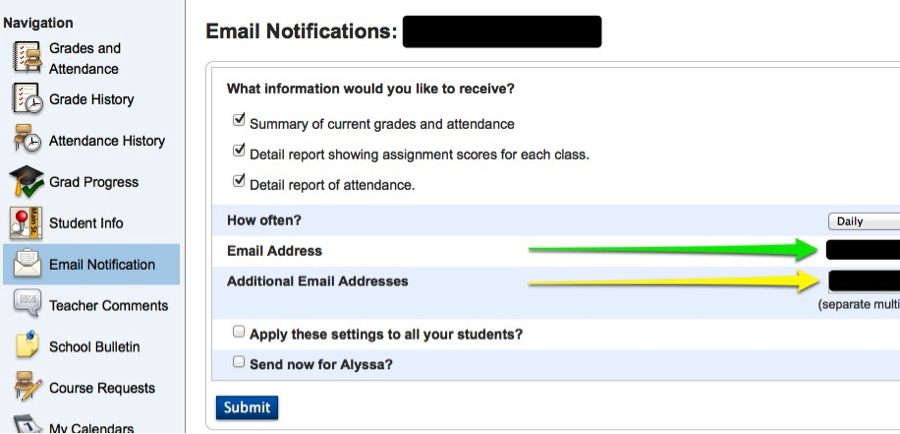
The schools can update a parent’s primary email address with the school, however the parents control their email notification settings. The school won’t be able to change this for them.
Please have the parent sign-in with the parent account.
Once in account, click on the “Email Notification” link on the left had side of the screen.
Please have the parent select any addresses found in “Additional Email Addresses” and delete them.
In the attached screenshot, from a parent account the green arrow points to the primary email address for the parent, which the schools can update.
The yellow arrow points to the additional address that parents can add to notifications. These have to be updated in the parent account. The schools can not make changes to those addresses or the other email notification preferences of the parent.
-
-
The second guardian will have to talk with the primary guardian to get the access information and create their own account. This is exactly the same process the primary guardian use. Troubleshooting a second guardian is the exact same way as the primary guardian.
-
-
This is an issue PowerSchool is working on. The workaround is to use the student’s log in information when iCal asks the parent to log in. The student’s log in information can be found by asking the student and/or in the student’s FirstClass.
-
-
- Find out the email address the parent used to create the account, user name, password,student(s)
- Verify that on the “Access Account” screen the accounts are enabled.
- Try the following
- Try the log in yourself
- Make sure the username is only using letters and numbers
- Make sure the account is attached to a student
- Search for the parent using the “Search Parents/Guardians” located on the student search page under other options and verify that the correct student is showing.
- If the correct student is not showing, remove any incorrect students and add the correct ones.
- Use the “Trouble logging in” link on log in screen
- Make sure the powerschool@glenbard.org is allowed through in the parent’s email
- Have the parent check their junk/spam folder
- Search for the parent using the “Search Parents/Guardians” located on the home page of PowerSchool and reset the password.
- The parent will get a notification that there password has changed
- The first time they log in with the new password they will be prompted to change the password
- Make sure the username is only using letters and numbers
- Make sure the account is attached to a student
-
-
As many as the parent and student would like.
-
-
The student logs in using the student information in their first class. This information can also be found on the modify info page in PowerSchool under student Web ID and Password
-
-
No, the information should only be changed in the most extreme situation and then only under the advisement of the IT department. This information is sent to all the parent and students once. It will cause confusion on which information is correct. Also this information is the student’s first class and cannot be changed once sent.