Making a Sale in Posterita
Bookstore sales are handled through a cloud based POS software called Posterita.
Getting There:
- Logging into Posterita will automatically open the sales screen.
- Otherwise, click the Menu tab at the top, then click Make a Sale.

Making a Sale:
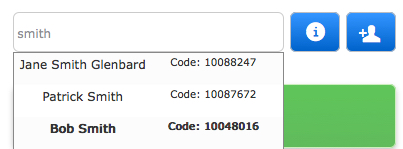
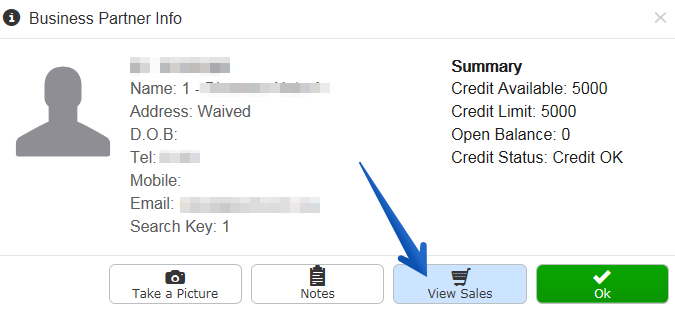
- Click in the customer field and scan the student’s ID or type the students name.

- Click on the matching student and click the OK button.

- Add items to the sale:
- Select items using the search bar.
- Click into the item field and scan the barcode or type the name of the item and hit enter.
- Matching items will appear in the middle of the screen.
- Click on the item to add it to the sale.

- Select items browsing the menu.
- Find the list of categories on the left hand side.
- Click on one of the categories like PE to see all matching items.
- Matching items will appear in the middle of the screen.
- Click on the item to add the sale.
- Select items using the search bar.
- The items on the sale will appear in a list on the right of the screen.
- To change quantity, click on the number directly to the left of the item on the sale.
- Change the number and click Apply.
- To change price, click the dollar amount directly to the right of the item on the sale.
- Change the amount and click OK.

- Change the amount and click OK.
- Click the green Sales button near the bottom right.

- Click Cash

- Enter the cash given in the Amount Tendered field.
- Click the buttons to add bills or coins. (i.e. Click the 20 button twice and the Amount Tendered will show $40)
- Give the appropriate change.
- Click OK
- Click Check

- Enter the check number
- Click OK
- Click Credit Card

- Scan the credit card from your credit card machine.
- Click OK
- Click On Credit for waived students

- Click OK
- Click Cash
- The receipt is automatically emailed to the student.
- Click the blue Print button to also print a receipt.