Using the SchoolPay Virtual Terminal for Events
Virtual Terminal is the in-person store for SchoolPay. Each school has 3 iPads that can be used for Virtual Terminal activity. The Events option is used to facilitate sales using the least steps possible.
Overview
A few steps are needed to get the iPad into the Events status. Once the Event is pulled up on the iPad, the user can continue to transact one sale after the other.
Getting to the Events Virtual Terminal
IMPORTANT: Before opening the SchoolPay software, check the volume and ensure that the volume is set at maximum. The credit card swipe communicates through the iPad’s headphone jack and will not work unless the volume is at maximum.
- Click the piggy bank icon (
 ) which will be found in the lower toolbar of the iPad.
 - Supply the POS credentials for your building and click Login. (Note: This account can only transact sales; not run reports, lookup activity, or issue refunds).
- Click VT from the menu bar
- From the drop-down menu, click Event
- A list of events will appear. Tap in the white space on the event that you want to run.
- This will display two grey circle icons on the right of the event.
- Click the icon that looks like a credit card.

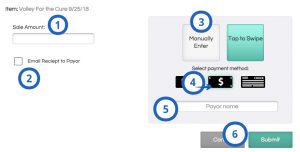
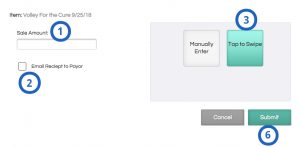
Transacting a Credit Card Sale
- Enter the amount in the Sale Amount field
- Optional: Send the customer an email receipt
- Check the box Email Receipt to Payor
- Type the email address of the customer
- Tap the green Tap to Swipe button
- Swipe the credit card
- Ask the customer for their zip and enter it into the zip code field.
- Click the green Submit button.
Transacting a Cash Sale
- Enter the amount in the Sale Amount field
- Optional: Send the customer an email receipt
- Check the box Email Receipt to Payor
- Type the email address of the customer
- Tap the grey Manually Enter button
- Click the black dollar icon
- The Payor name field is required in this software and must be at least two characters. Users can simply enter qq to move along with the sale instead of typing out the full payor name.
- Click the green Submit button.